
Reusable Press-On Nails: A Quick, Smart Way to Wear a Salon Look
I’ve ruined enough salon appointments to know one truth: sometimes you need a perfect manicure in five minutes — not three hours. That’s where reusable adhesive press-on nails come in. They give you a salon-level look with none of the fumes, waiting time, or post-appointment regrets. If you want nails that look polished, last through a workweek or a weekend getaway, and can be worn again, this guide is for you.
Below: a friendly five-minute routine, the small mistakes that kill adhesion, a clear cost comparison, and real tips for keeping your set reusable and travel-ready.

Why reusable press-ons actually make sense
Press-ons used to mean fragile, one-time gimmicks. The new generation—durable ABS press-ons with adhesive tabs—are different. They’re built to be cleaned, stored, and reapplied, which matters in three ways:
-
Time: A full mani in under five minutes.
-
Money: One reusable set can replace multiple salon appointments (see the cost comparison below).
-
Waste: Reuse cuts down on single-use polish, wraps, and salon materials.
For an accessible, practical guide to modern press-ons and how they compare to salon options, see Byrdie’s primer on press-on nails.
The five-minute routine
Step 1 — Size & layout (30 seconds). Lay out the set and match each press-on to your nail beds. If you’re between sizes, pick the smaller one — it’s easier to file an edge than fix a popped nail. (Tip: Use our Sizing Guide)

Step 2 — Prep (60 seconds). Gently push back cuticles, give nails one light buff to remove shine, and wipe with an alcohol pad. Clean, dry nails = longer hold.
Step 3 — Tabs (30 seconds). For reusability, use adhesive tabs: center the tab on your natural nail.
Step 4 — Apply (15 seconds per nail). Align at the cuticle line, press from base to tip to eliminate air, and hold 5–10 seconds.
Step 5 — Shape & pack (60 seconds). File any rough edges for comfort.
Need visual step-by-step tips and testing notes?
We regularly share detailed tutorials on our social media, covering topics like how to properly apply press-on nails, how to remove them safely, and tips to make them last longer.

Common mistakes that shorten wear time
-
Skipping prep: Oils and lotion block adhesion.
-
Using too much tabs: Creates pressure points that pop.
-
Not replacing tabs between wears: Tabs lose tack; swap them out.
-
Rough removal: Pulling fast damages both the press-on and your natural nail — soak and ease them off.
How many wears can you realistically get?
With careful removal, cleaning, and fresh tabs between uses, many high-quality reusable sets can be worn up to five times — sometimes more if you use tabs and avoid heavy-duty glue. Editors who test press-ons (People, Byrdie) report reusable lines that are explicitly marketed for multiple reapplications.
Want to compare specific sets? Browse reusable designs here.
The numbers — simple cost comparison
People ask, “Is it actually cheaper?” Here’s a no-frills example.
-
Salon gel mani: $45 per visit. 6 visits a year → $270.
-
Reusable press-ons: $15 per set, ~5 wears per set. To get 15 manicures annually you need 3 sets → $45.
-
Adhesive tabs: $4 per pack (20 tabs) → $0.20 per use. For 15 uses → $3.
-
Total yearly cost with press-ons: $48.
-
Per wear cost: $3.20 vs $45 per salon visit.
Even conservative estimates show substantial savings — which is why editors and testers highlight press-ons as a cost-effective alternative.
Curious? Try one neutral reusable set and a pack of adhesive tabs to see how press-ons fit into your routine.
Mots clés:
Précédent
Discover the Art of Handmade Press-On Nails
Suivant
Fall 2025 Nail Trends: Warm Hues and Creative Press-Ons
Articles Liés
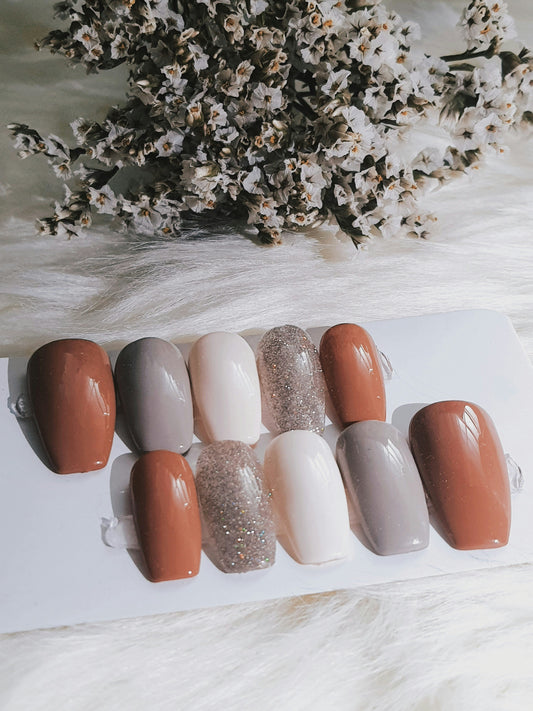
12 Neutral Nail Colors You Can Wear All Year
Sep 22 2025